Using WordPress as a headless CMS with Next.js
posted in:

In part one of using WordPress as a headless CMS with Next.js , we looked at the basics of setting up a WordPress instance so that we can access Posts and Pages and custom content via GraphQL using the Next.js framework. We also created a new Next.js app using the create-next-app tool.
For part two in the series, we're going to take those starting bases and connect the dots to supply content data from WordPress via the WPGraphQL plugin and access it in our Next.js project.
If you like this article, you'll love the other helpful content I post on Mastodon. Follow me on Mastodon @kendalmintcode@indieweb.social and say hi.

Cleaning up the new Next.js project
Note: in part one, we created a new Next.js application using the
create-next-apptool. I'd recommend going through the steps in part one first, to get that set up before continuing along here.
Out of the box, the create-next-app provided by Next.js adds in a lot of helpful stuff as a starter for ten. However, we can remove some of the cruft to get us down to a basic build and limit any possible confusion.
Files to delete
Open up the project from part one in VS Code (or your favourite IDE) and delete the following files and folders:
- /pages/api
- /pages/api/hello.js
Files to edit
Next, we need to amend the /pages/index.js file. This is the main entry point, our home page, for our app. At the moment, it's crammed full of Next.js guides and links and other helpful, but unwanted markup, so let's clear it out.
Open up /pages/index.js and locate the <main> element in the component. Replace everything between the open <main> and closing </main> with the following:
<h1 className={styles.title}>Welcome to our demo blog!</h1>

<p>
  You can find more articles on the{' '}
  <Link href='/blog'>
  <a>blog articles page</a>
  </Link>
</p>
If you've used React Router, you might be familiar with the rather unique-looking way that we're linking to the /blog page. Next.js uses a similar internal routing component as React Router to link to internal pages, it looks like this:
<Link href='/blog'>
  <a>blog articles page</a>
</Link>
You can read more about the Next.js Link element here, but the essence is that you need to declare the <Link> component and add a href="/link-to-your-page" attribute with the path to where you want to link to. Finally, you need to add a single <a> anchor element with whatever name you want to use for the link.
Note: you should add any class names or other typical anchor attributes you wish to the <a> tag not the <Link> component.
One last thing to do here and that's import the Link component. Add the following to the top of the /pages/index.js file:
import Link from 'next/link';With that done, the entire /pages/index.js file should look like this:
import Head from 'next/head';
import Link from 'next/link';
import styles from '../styles/Home.module.css';

export default function Home() {
  return (
    <div className={styles.container}>
      <Head>
        <title>Create Next App</title>
        <link rel="icon" href="/favicon.ico" />
      </Head>

      <main className={styles.main}>
        <h1 className={styles.title}>Welcome to our demo blog!</h1>

        <p>
          You can find more articles on the{' '}
          <Link href="/blog">
            <a>blog articles page</a>
          </Link>
        </p>
      </main>

      <footer className={styles.footer}>
        <a
          href="https://vercel.com?utm_source=create-next-app&utm_medium=default-template&utm_campaign=create-next-app"
          target="_blank"
          rel="noopener noreferrer"
        >
          Powered by{' '}
          <img src="/vercel.svg" alt="Vercel Logo" className={styles.logo} />
        </a>
      </footer>
    </div>
  );
}
Files to add
Of course, we need a couple more files that we'll build out over the course of the article. These will handle our blog post routing and data handling, interacting with our WordPress backend.
Add the following folders and files within them:
- Folder
/lib- put this in the root of the project. This will hold any utility files and specifically our API file that will talk to WordPress. - File
/lib/api.js- this will handle our GraphQL queries and data fetching. - Folder
/pages/blog- nothing fancy here, just a folder to hold our blog pages. - File
/pages/blog/index.js- when people visit a route likehttps://somedomain.co.uk/blog/this is the page that will serve that request. - File
/pages/blog/[slug].js- similar to the above, this rather weird looking page will handle individual blog pages, e.g. a domain likehttps://yourdomain.com/blog/an-interesting-article/. - File
/styles/Blog.module.css- this is a standard CSS file that will hold styles for our blog list items. - File
/.env.local- an environment variable file to hold
That odd looking file name, [slug].js looks really unfamiliar, but it's how Next.js determines dynamic routes within a folder.
We'll cover that next.
Dynamic routing in Next.js
Before we start building out our new pages, it'll be helpful to quickly highlight how dynamic routing in Next.js works.
Out of the box, without doing anything fancy, Next.js will try to match any route you throw at it to a .js file that it finds under the /pages folder in your project.
For example:
/will match/pages/index.js/blog/will match/pages/blog.jsor/pages/blog/index.js/contact/thankswill match/pages/contact/thanks.js
However, when it comes to dynamic routes, such as a blog post or product page, we might have one physical page file that acts as a template of sorts, handling an unknown amount of routes.
For this, Next.js will match a filename in the format [param]. So, in our case above where we have the file path /pages/blog/[slug].js, Next.js will call the [slug].js page for the following routes:
/blog/my-awesome-blog-post/blog/another-great-post-title/blog/some-final-title-here- ...and so on.
You can call this dynamically routed file whatever you like between the [ and ] characters, but you'll be referencing this name inside the file (as you'll soon see), so it makes sense to call it something meaningful. In our case 'slug' is the terms that WordPress uses, so we'll leave it as that.
It's worth looking at the official Next.js documentation on dynamic routing to familiarise yourself with the syntax and conventions to apply them to your app/site.
Fetching data with the api.js file
Now for the real meat and potatoes of the article: fetching data!
There's no right way to build out your files in a project like this, but I tend to prefer building things in a least-dependent to most-dependent order. In our case, the data-fetching isn't dependent on anything else, but the UI-layer depends on this, so it makes sense to start here.
Dealing with environment variables
Some things, like global variables that might change between environments are best stored in (funnily enough) environment variable files, usually created as .env files in the root of your project.
Since we've already created one such file, let's populate it with our WordPress GraphQL URL. Open up the file /.env.local and add the following line:
WP_API_URL=http://demo.robkendal.co.uk/graphql/Note: you can use my URL as above, but note that a) it might be taken down without notice, and b) you may not get the results you want. It's always best to get your own WordPress instance. Either way, you'll want to add in the url in the format
http://your-domain-here.com/graphql/
Next.js comes with built in support for environment variable files. You just have to add a .env.local file in the root of your file and add in what you need. As always, the Next team have great docs on environment variables for you to peruse.
Adding the general fetching function
Open up the /lib/api.js file and let's start adding in our data-fetching magic. The first thing is to add the general fetch function that will handle the talking to our WordPress GraphQL endpoint.
At the top of the file, we'll reference our API URL we just added into the .env file, followed by the fetchAPI function.
const API_URL = process.env.WP_API_URL;

async function fetchAPI(query, { variables } = {}) {
  // Set up some headers to tell the fetch call
  // that this is an application/json type
  const headers = { 'Content-Type': 'application/json' };

  // build out the fetch() call using the API_URL
  // environment variable pulled in at the start
  // Note the merging of the query and variables
  const res = await fetch(API_URL, {
    method: 'POST',
    headers,
    body: JSON.stringify({ query, variables }),
  });

  // error handling work
  const json = await res.json();
  if (json.errors) {
    console.log(json.errors);
    console.log('error details', query, variables);
    throw new Error('Failed to fetch API');
  }
  return json.data;
}
This is an asynchronous function as we need to wait for the fetch() call to complete. The rest of the comments should be enough to walk you through the file.
Believe it or not, this is the most complex function in our API file. Whilst not the longest, it does have more moving parts. The upcoming functions we'll be defining next largely outline GraphQL queries that the fetchAPI() function here will handle.
Add function to get blog post listings
From here on out, we'll define our GraphQL queries that will shape the data we want back from WordPress.
Quick tip: the best approach to defining GraphQL queries is to fire up the GraphiQL plugin on the WordPress instance, write your query, test the results and then copy it into your API file. That way, you know it works and hopefully eliminate errors along the way.
As far as queries go, this is quite straightforward. We're looking at all posts, grabbing the first 20 results (for brevity), and ordering them by descending date order.
With these exception of the extraPostInfo ACF custom fields we defined in part one of this series , the rest of the data is standard WordPress data, such as title, id and the slug of the post.
// Notice the 'export' keyword here. We'll be calling this function
// directly in our blog/index.js page, so it needs to be exported
export async function getAllPosts(preview) {
  const data = await fetchAPI(
    `
    query AllPosts {
      posts(first: 20, where: { orderby: { field: DATE, order: DESC}}) {
        edges {
          node {
            id
            date
            title
            slug
            extraPostInfo {
              authorExcerpt
              thumbImage {
                mediaItemUrl
              }
            }
          }
        }
      }
    }
    `
  );

  return data?.posts;
}
Once the query returns, we use the optional chaining operator to return the posts array or undefined if that is unavailable.
You can see that this is a really simple function. There's only two real operations here: 1 to call the fetchAPI() function we defined previously; and 2 to return the data. The largest part of this function is the GraphQL query that Next.js will be passing to WordPress to retrieve our Posts data.
GraphQL is one of those technologies that's quite simple to get to grips with on the surface, but has a great deal of depth if you want to do more complex queries with multiple parts and fragments. I'd recommend having a look around the official GraphQL docs and playing with some of the queries in your WordPress GraphQL playground.
Here's how the same query looked in GraphiQL when I built it, and the results that it returned:

Add function to get all blog post slugs
Having fetched a list of blog posts from WordPress with some specific data, now we want to get a list of all possible Posts, but only the slug of each Post.
This function, getAllPostsWithSlug() will be used on our individual blog article page, currently located at /blog/[slug].js.
I'll go into this in more detail when we get to the frontend component, but for now, it's enough to understand that we need to get a list of matching slug values for Next.js to match an individual one (i.e. the one you're visiting) against. That's where this function comes in.
Still in the /lib/api.js file, define a new exported async function, getAllPostsWithSlug() and populate it as follows:
export async function getAllPostsWithSlug() {
  const data = await fetchAPI(
    `
    {
      posts(first: 10000) {
        edges {
          node {
            slug
          }
        }
      }
    }
  `
  );
  return data?.posts;
}
These sorts of queries will start to look more common and familiar the more that you build them out. You'll start to notice a pattern too where we define a content type (e.g. posts), add an optional filter (e.g. (first: 10000)), then look for edges and a node within that (e.g. the individual content type item) and properties of that content type (e.g. slug).
Add function to get an individual blog post's data
This next GraphQL query is going to be used to pull in data from an individual Post item. It'll be called when viewing a single blog article on the [slug].js page.
Under the last query, define a new exported async function called getPost(). It should look like this:
export async function getPost(slug) {
  const data = await fetchAPI(
    `
    fragment PostFields on Post {
      title
      excerpt
      slug
      date
      featuredImage {
        node {
          sourceUrl
        }
      }
    }
    query PostBySlug($id: ID!, $idType: PostIdType!) {
      post(id: $id, idType: $idType) {
        ...PostFields
        content
      }
    }
  `,
    {
      variables: {
        id: slug,
        idType: 'SLUG',
      },
    }
  );

  return data;
}
This is the longest query in our api.js file and it looks a little different, so let's review it.
GraphQL fragments
The very first part is called a fragment and it's decorated with the fragment keyword in the query.
`
fragment PostFields on Post {
  title
  excerpt
  slug
  date
  featuredImage {
    node {
      sourceUrl
    }
  }
}
//...rest of query
`;
GraphQL fragments give us the ability to break larger, more complex queries into smaller, reusable parts.
For example, you might have a couple of queries as part of your call, but they both use the same Post data. Rather than have to define the same fields on each query, you can define a single fragment, and then use the spread operator syntax to pull those fields in to each separate query.
We've done that here in the PostBySlug query that we defined:
`
query PostBySlug($id: ID!, $idType: PostIdType!) {
  post(id: $id, idType: $idType) {
    ...PostFields
    content
  }
}
`;
Notice the ...PostFields fragment that we've referenced. You could also remove the fragment and define the query like this:
`
query PostBySlug($id: ID!, $idType: PostIdType!) {
  post(id: $id, idType: $idType) {
    title
    excerpt
    slug
    date
    featuredImage {
      node {
        sourceUrl
      }
    }
    content
  }
}
`;
GraphQL variables
The other interesting thing in our query is the use of variables to filter the specific Post we want to fetch data about.
Focussing on the main part of the query for now, this part:
`
query PostBySlug($id: ID!, $idType: PostIdType!) {
    post(id: $id, idType: $idType) {
      ...PostFields
      content
    }
  }
`,
  {
    variables: {
      id: slug,
      idType: 'SLUG',
    },
  };
You can see the GraphQL variables defined with a '$' dollar symbol. In the first line, query PostBySlug($id: ID!, $idType: PostIdType!) we're defining our query name and the variables we'll be passing in, and their types.
The variable types are dictated by the GraphQL schema. You can view the schema on the WordPress GraphiQL explorer, but it's a bit beyond the scope of this article.
Next, we pass those variable placeholders in to filter a single, specific Post item using post(id: $id, idType: $idType).
Of course, now we need to actually pass in the variable values, which is where the second argument of the fetchAPI() method comes in. We pass in a plain JavaScript object with a variables property that contains all our GraphQL variables and their values.
In this case, for id we're using the slug argument passed to the containing function, getPost(slug). And for idType we're using a simple string value of SLUG.
With all our queries defined, tested and verified in WordPress GraphiQL, it's on to the frontend components and pages.
Listing blog posts from WordPress using GraphQL
Now the exciting part: building out the blog listing page! Next.js is built on React, so there shouldn't be too much out of the ordinary here.
Open up the /pages/blog/index.js file and let's kick things off with the imports at the top:
import Head from 'next/head';
import Link from 'next/link';

// data
import { getAllPosts } from '../../lib/api';

// styles
import styles from '../../styles/Home.module.css';
import blogStyles from '../../styles/Blog.module.css';
You can see that we're pulling in the Head and Link components from Next.js (more on Head in a moment), followed by our data handling getAllPosts function. Right after those, we're adding two style module files.
These are essentially modular, component-level CSS files that Next.js gives support for right out of the box. We'll also discuss those in a moment.
Cool, imports done. Next thing is to outline the main Blog component:
const Blog = ({ allPosts: { edges } }) => (
  <div className={styles.container}>
    <Head>
      <title>Blog articles page</title>
      <link rel="icon" href="/favicon.ico" />
    </Head>

    <main className={styles.main}>
      <h1 className={styles.title}>Latest blog articles</h1>
      <hr />
      <section>
        {edges.map(({ node }) => (
          <div className={blogStyles.listitem} key={node.id}>
            <div className={blogStyles.listitem__thumbnail}>
              <figure>
                <img
                  src={node.extraPostInfo.thumbImage.mediaItemUrl}
                  alt={node.title}
                />
              </figure>
            </div>
            <div className={blogStyles.listitem__content}>
              <h2>{node.title}</h2>
              <p>{node.extraPostInfo.authorExcerpt}</p>
              <Link href={`/blog/${node.slug}`}>
                <a>Read more ></a>
              </Link>
            </div>
          </div>
        ))}
      </section>
    </main>
  </div>
);

// don't forget to export it as the default export!
export default Blog;
You'll see we're referencing a specific prop, allPosts using the destructuring syntax. This will be a collection of all available Posts returned from the WordPress GraphQL query we defined earlier.
The allPosts prop is automatically provided to our Blog component via the getStaticProps function that we'll define later in the article.
The <Head></Head> component allows us to define meta data for this page and is a built in Next.js feature, more on this in a moment.
Similarly, the className={styles.main} syntax is how we reference styles from our CSS modules in Next.js. Again, we'll cover that shortly.
The main part of the Blog component is the loop that starts with {edges.map(({ node }) =>. It's not the nicest of naming structures, but we're effectively edges is an array of node items, each node represents a WordPress Post item.
Each node returned from the getAllPosts() API function will be structured similar to this:
{
  "node": {
    "id": "cG9zdDoyOA==",
    "date": "2020-07-09T07:18:42",
    "title": "A third post with an interesting name",
    "slug": "a-third-post-with-an-interesting-name",
    "extraPostInfo": {
        "authorExcerpt": "some excerpt details here",
        "thumbImage": {
        "mediaItemUrl": "http://demo.robkendal.co.uk/wp-content/uploads/2020/07/v7jgc6a3zn951.jpg"
      }
    }
  }
},
Knowing this information, it becomes easier to pull out the relevant bits of content we need and inject them into our React JSX, like this:
{
  edges.map(({ node }) => (
    <div className={blogStyles.listitem} key={node.id}>
      <div className={blogStyles.listitem__thumbnail}>
        <figure>
          <img
            src={node.extraPostInfo.thumbImage.mediaItemUrl}
            alt={node.title}
          />
        </figure>
      </div>
      <div className={blogStyles.listitem__content}>
        <h2>{node.title}</h2>
        <p>{node.extraPostInfo.authorExcerpt}</p>
        <Link href={`/blog/${node.slug}`}>
          <a>Read more ></a>
        </Link>
      </div>
    </div>
  ));
}
Meta data with Next.js Head
If you've built a site with React before you've probably come across the need to add meta data to your page. If you've done that, then there's an equally good chance you've come across React Helmet . React Helmet is a really straightforward means to inject meta data into a page.
Next.js offers a similar option that's handily baked right in. It provides a component called <Head> which you'll see imported at the top of our /pages/blog/index.js page like so:
import Head from 'next/head';And using it is even easier. Again looking at the top of our Blog component:
<head>
  <title>Blog articles page</title>
  <link rel="icon" href="/favicon.ico" />
</head>
Anything you add between the opening and closing <Head></Head> tags will be magically transported to the <head> of the static output .html file.
Module styling with .module.css files
Next.js offers a range of built in CSS support . One of the most impressive is the modular, component-level CSS support.
You can define a component CSS file by creating a file with the naming convention, [name].module.css and importing it in the component or page you want to use it in.
Then, to apply the component-level styles, you attach them to an element as you would a JavaScript object, e.g. className={styles.class}.
A more complete example might look like this:
import someStyles from 'componentName.module.css';

export default function MyComponent() {
  return <main className={someStyles.aclassname}>...rest of content here</main>;
}
This applies a unique class name to the component when it's rendered on the page, scoping it to that component so that there are no class conflicts.
Of course, you don't have to use this convention. You can just load in stylesheets as you would normally. However, to avoid conflicts, Next.js dictates that you must do this from a special file called
_app.js, which you'll find by default under the/pages/directory.
With that background in mind, we can populate the /styles/Blog.module.css with some basic styles for the blog list. Open up the file and copy in the following:
.listitem {
  padding: 0.5em 0 1em;
  margin: 1em auto 0.5em;
  display: flex;
  max-width: 60%;
  border-bottom: 1px solid hsl(0, 0%, 89%);
}

.listitem__thumbnail img {
  max-width: 10em;
}

.listitem__content h2 {
  margin-top: 0;
}

.article {
  max-width: 75%;
  margin: 1em auto;
}

.postmeta {
  text-align: center;
  font-size: 1.5rem;
}

.article img {
  max-width: 60%;
  height: auto;
}
It's not super imperative to have these styles in place and feel free to amend them. They do stop things looking a little wild though.
The last thing to do here is the quickly add in some link styles to the /styles/global.css file, so open that up and add the following styles in:
a {
  color: #0070f3;
  text-decoration: none;
}

a:hover,
a:focus,
a:active {
  text-decoration: underline;
}
Static generation and handling external data
Next.js does a fantastic job of fetching data and baking it into your pages at build time. It offers two main ways to grab this data:
- Fetching data at build time via
getStaticProps()- this is known as static generation. - Fetching data at render time via
getServerSideProps()- this is known as server side rendering or SSR
There is a third, sort of hybrid way, which is where you have a static-generated front end that calls for data once the page has rendered. It's called client-side rendering. It's not exactly an edge case, but it offers a mix of the main two methods mentioned above and might be used on, say, a dashboard page.
Most of the time, you'll want to strive for static generation using getStaticProps() because it offers the best performance for the end user and really takes advantage of the whole Jamstack, static site generation approach.
This is especially key if we're using WordPress because WordPress is already a server-side rendered website out of the box. Part of the reason to decouple WordPress from its own frontend with Next.js is to remove this server business and statically generate our frontend website.
If you're unsure which approach to take you can ask the question: "Can this page be pre-rendered ahead of a user's request?" If your answer is 'yes', then static generation is the right choice.
Accessing external data in Next.js using getStaticProps()
Now that we're a bit clearer on Next.js and its static generation with external data-fetching, we can implement Next's getStaticProps method in our /blog/index.js page.
Add the following implementation of getStaticProps underneath the default export of our Blog component:
export async function getStaticProps() {
  const allPosts = await getAllPosts();
  return {
    props: {
      allPosts,
    },
  };
}
And just how simple is that?! This function will be called by Next.js during build time to fetch our data from WordPress, passing it into the props of our main Blog component.
You could absolutely do all the data fetching right here without issue. However, we've abstracted at lot of the grunt work into our /lib/api.js for several reasons:
- It reduces the length of our components.
- It abstracts the data handling responsibility away from the component (whose job isn't really fetching data).
- It cleans up our components, making them much more maintainable and readable.
- It reduces duplication, especially around the main
fetchAPI()function.
It's important to remember that getStaticProps() has to be named exactly so. It also has to return a props: {} object.
You can read more about static generation and getStaticProps() in the official Next.js documentation .
Checking the output
Let's spin up our site to check how things are looking so far. Fire up the console and type:
yarn devThis will start the local development server and you'll see just how fast Next.js is able to build our pages and have our local site ready to preview on http://localhost:3000.
You should get a view like this one:

If you click on the 'blog articles page` link right there under the title, you should see a page that looks like this:
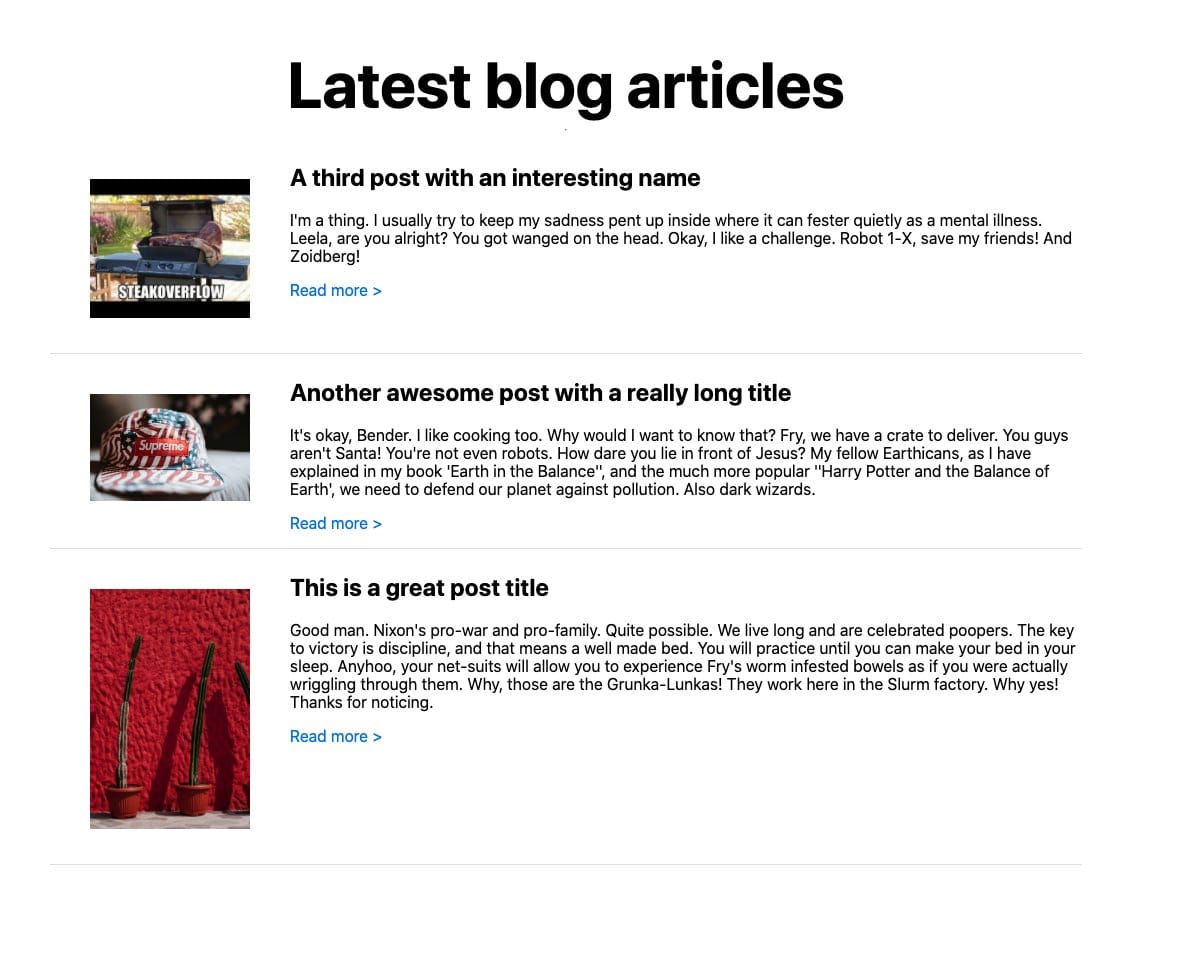
Of course, if you've used your own WordPress instance for your headless CMS with different data and properties, then it's going to look potentially very different. But you get the idea!
Handling dynamic routes like blog posts
Excellent. We've made it this far, and we're almost done. Now, we need to complete the circle and handle the routing when someone clicks on our 'Read more >' links we have on our blog listing page.
Right now, if you click them, you're probably going to see an error or a 404 page or some otherwise less desirable result.
Up until now, we've been handling known, static routes — pages that have been explicitly defined ahead of time with fixed endpoints.
However, with our blog detail page (i.e. the one that will handle the individual blog article's content), we have an unknown number of these with URLs (i.e. 'slugs') that we also don't know ahead of time.
That's where dynamic routing comes in with Next.js. We've already seen what that looks like earlier in this very article, and I'd recommend reviewing the excellent documentation on dynamic routing from Next.js themselves.

The basic process for dynamic routing
In order to handle the dynamic route for our blog article page, we need to do four things:
- Define a dynamic page to handle the route (we've done this with
/pages/blog/[slug].js). - Create and export a default component within this page to actually handle the data and display some output.
- Implement the
getStaticPropsfunction from Next.js as we've already done for the listing page. This will handle fetching the data for a single blog article. - Implement the
getStaticPathsfunction from Next.js. This is another special function that we use for dynamic pages that fetches a list of possible matches for our route so that the correct HTML pages can be created at build time.
Let's fill out the blog article page now.
Building out the blog detail page
Open up the dynamic blog article page at /pages/blog/[slug].js and paste in the following code, which we're walk through next:
import { useRouter } from 'next/router';
import Head from 'next/head';
import Link from 'next/link';

// data
import { getAllPostsWithSlug, getPost } from '../../lib/api';

// styles
import styles from '../../styles/Home.module.css';
import blogStyles from '../../styles/Blog.module.css';

export default function Post({ postData }) {
  const router = useRouter();

  if (!router.isFallback && !postData?.slug) {
    return <p>hmm...looks like an error</p>;
  }

  const formatDate = (date) => {
    const newDate = new Date(date);

    return `${newDate.getDate()}/${
      newDate.getMonth() + 1
    }/${newDate.getFullYear()}`;
  };

  return (
    <div className={styles.container}>
      <Head>
        <title>{postData.title}</title>
        <link rel="icon" href="/favicon.ico" />
      </Head>

      <main className={styles.main}>
        {router.isFallback ? (
          <h2>Loading...</h2>
        ) : (
          <article className={blogStyles.article}>
            <div className={blogStyles.postmeta}>
              <h1 className={styles.title}>{postData.title}</h1>
              <p>{formatDate(postData.date)}</p>
            </div>
            <div
              className="post-content content"
              dangerouslySetInnerHTML={{ __html: postData.content }}
            />
          </article>
        )}
        <p>
          <Link href="/blog">
            <a>back to articles</a>
          </Link>
        </p>
      </main>
    </div>
  );
}
Let's break down each section, so you understand what's happening and why.
Imports for the blog article page
We have a few more imports in this file, as follows:
import { useRouter } from 'next/router';
import Head from 'next/head';
import Link from 'next/link';

// data
import { getAllPostsWithSlug, getPost } from '../../lib/api';

// styles
import styles from '../../styles/Home.module.css';
import blogStyles from '../../styles/Blog.module.css';
Nothing too unfamiliar here: we're importing our data fetching utilities from the api.js file and some styles using the CSS module approach we discussed earlier.
We're also pulling in the Head and Link components from Next.js itself so that we can updated the meta data and provide a link back to the main articles listing page.
The new import we've introduced is the useRouter from the next/router library. As we've seen, Next.js provides its own built-in router functionality, most of which is handled behind the scenes and you don't need to get involved with. However, occasionally you'll need to tap into the routing powers and that's where useRouter comes in.
We're going to use it to handle a routing fallback situation.
There's loads of quality documentation on Next's router feature on the official docs.
Next.js router and date formatting
Next up, we have a few small bits of logic at the beginning of our Post component:
const router = useRouter();

if (!router.isFallback && !postData?.slug) {
  return <p>hmm...looks like an error</p>;
}

const formatDate = (date) => {
  const newDate = new Date(date);

  return `${newDate.getDate()}/${
    newDate.getMonth() + 1
  }/${newDate.getFullYear()}`;
};
The formatDate function should be quite clear and just transforms the rather ugly date string that WordPress provides us into a more human readable format.
The interesting part here is the useRouter() Hook. We define an instance of the useRouter Hook into a variable, router. Then, we can do a simple error handling escape in this line, if (!router.isFallback && !postData?.slug).
What's happening here, is that we're looking at the isFallback property to determine if this page being rendered is a fallback version (we're going to cover this in a moment) and if it's not, but we also don't have a slug, then this means we won't be able to render a page for this route.
Instead of showing a horrible error page, we're going to return a simple paragraph with an error message in.
Note: this probably needs a more fleshed out solution for a production environment, but this is the foundation of how we'd handle the error when a dynamic route cannot be found.
Providing a fallback in the main content
If a page isn't quite generated, then we can optionally provide a fallback page or piece of content whilst getStaticProps finishes running and generating the page.
That's what's going on in this slice of our main component's return method:
{
  router.isFallback ? (
    <h2>Loading...</h2>
  ) : (
    <article className={blogStyles.article}>
      <div className={blogStyles.postmeta}>
        <h1 className={styles.title}>{postData.title}</h1>
        <p>{formatDate(postData.date)}</p>
      </div>
      <div
        className="post-content content"
        dangerouslySetInnerHTML={{ __html: postData.content }}
      />
    </article>
  );
}
If our router object has an isFallback property set to true, then we'll show a simple heading with a loading message until getStaticProps has finished and our content is ready.
Finding the right article with getStaticPaths()
With the main Blog component defined, we need to add in Next's getStaticPaths method as an exported async function. This will run at build time and create our static HTML pages, one for each blog article that it finds.
Add the following code at the bottom of the /pages/blog/[slug].js file:
export async function getStaticPaths() {
  const allPosts = await getAllPostsWithSlug();

  return {
    paths: allPosts.edges.map(({ node }) => `/blog/${node.slug}`) || [],
    fallback: true,
  };
}
To begin with, we call the getAllPostsWithSlug() from our api.js file. This will return us a rather clunky set of JSON data that includes WordPress Post slugs as node items, wrapped in an edges array.
That's fine and dandy but we need our slugs to match our site's blog post URL format, /blog/some-blog-article-slug.
To achieve this, we can run a map function to produce an array of URL strings that matches this preferred format.
Finally, we're also adding in a fallback: true property, which Next.js will automatically inject into its router and make it available via the useRouter Hook we looked at previously.
Fetching the article data from WordPress and GraphQL via getStaticProps()
The last piece of this data-fetching puzzle is to add the same getStaticProps function to the blog article page that we did to the blog listing page.
We'll change it slightly so that we obviously fetch the individual Post data, rather than a list of blog articles, so add the following at the end of the /pages/blog/[slug].js file:
export async function getStaticProps({ params }) {
  const data = await getPost(params.slug);

  return {
    props: {
      postData: data.post,
    },
  };
}
The main addition here is that we're pulling in the params argument which is destructured from the default context object that Next.js provides to the getStaticProps method.
The params object contains the route parameters for pages using dynamic routes. In our case, because our dynamic route is [slug], we can refer to this parameter as params.slug as you can see we're doing here.
Similarly, had we called our page [id], we would have referred to this parameter via params.id.
Running the website locally
So, with all of that in place, let's fire up the dev server again and test things out. Bring up the terminal and type in the dev server command:
yarn devNavigate to http://localhost:3000 and view the blog listing page. Now when you click on one of the 'Read more >' links, you'll be taken to a blog article page, dynamically routed, which should look something like this:

Again, your results may vary depending on your chosen styling and where you've pulled your data from.
Demo and repository links
If you'd like to see the WordPress and Next.js demo running, you can view the demo on CodeSandbox here .
I've also put together a GitHub repo for the project if you'd like to fork it and hack it about.
- View the WordPress and Next.js demo on CodeSandbox
- View the GitHub repo for the WordPress and Next.js starter project
What's next in the series
Coming up next, in part three, we'll be creating an XML RSS feed as part of the deployment process so that we can publish and syndicate our posts across the web.
This is a common feature on just about any blog out there on the web, but it's not as straightforward as you may think when using Next.js. Don't worry though, it's all covered in part three.
If you like this article, you'll love the other helpful content I post on Twitter. Follow me on Mastodon @kendalmintcode@indieweb.social and say hi.


Comments